windows 部署hexo博客至github
windows部署hexo
创建一个存放你博客的文件夹,进入文件夹,右键选择 Git Bash Here,然后设置npm的镜像源为淘宝镜像源,这样能加快下载插件速度
shell
1 | npm config set registry https://registry.npm.taobao.org |
输入npm install hexo -g,开始安装Hexo
Code
1 | 输入npm install hexo -g,开始安装Hexo |
输入hexo -v,检查hexo是否安装成功
Code
1 | $ hexo -v |
输入hexo init,初始化该文件夹(有点漫长的等待。。。)
Code
1 | $ hexo init |
看到后面的“Start blogging with Hexo!”就说明初始化好了
输入npm install,安装所需要的组件
Code
1 | $ npm install |
配置Github
配置Git账户和邮箱
在你的博客文件夹下右键Git Bash Here
查看githubID https://api.github.com/users/deserce
Code
1 | $ git config --global user.name "20250021" |
**这里的用户名称和邮箱换成你自己的**点击New repository,创建一个新仓库,仓库名必须要遵守格式:账户名.github.io,不然接下来会有很多麻烦。并且需要勾选Initialize this repository with a README。
使用ssh-keygen生成私钥和公钥
命令如下:
Code
1 | $ ssh-keygen -t rsa |
密钥上传到Github
Code1
$ cat ~/.ssh/id_rsa.pub
到GitHub网站上点右上角Settings,SSH and GPG Keys,新建一个key,将上面的结果复制填进去就好了
输入ssh -T git@github.com,测试添加ssh是否成功。如果看到Hi后面是你的用户名,就说明成功了
Code1
ssh -T git@github.com
配置Deployment,在其文件夹中,找到_config.yml文件,修改repo值(在末尾),repo值是github项目里的ssh。
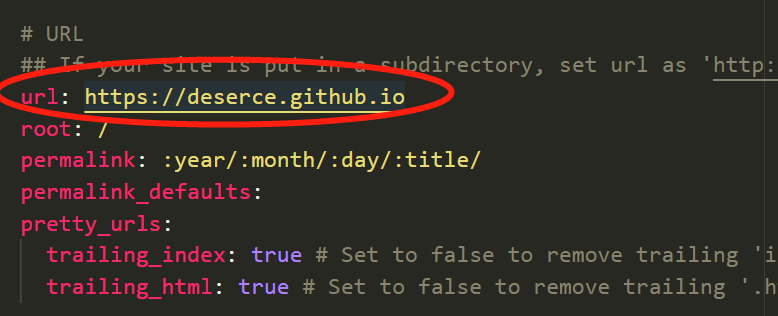
配置网址,同样的配置文件中将网址改为自己的网址。
HexoBlog部署到git我们需要安装hexo-deployer-git插件,在blog目录下运行一下命令进行安装
Code1
$ npm install hexo-deployer-git --save
发表文章
我们来试着创建一篇文章,使用
Code
1 | $ hexo new post hello,hexo |
之后会在source文件夹的_post文件夹中看到你新建的文件。
使用编辑器编好文章,接着就可以使用命令:
Code1
$ hexo d -g
生成以及部署了。在打开你的博客主页就可以看到你创建的文章了。
参考资料:
1.https://github.com/axh2018/hexo_blog
2.https://www.jianshu.com/p/1bcad7700c46


